Featured

Showing posts with label Craft n Decor. Show all posts

Knock on Wood


Make trick-or-treaters take a second look with this clever pumpkin carving designed to look like a spooky tree trunk. Download the free pattern and transfer it onto your pumpkin. Use a gouging tool to carve the words and wood grain; use a knife or carving tool to cut out the
knots. 
Carve distinct character into this year's jack-o'-lanterns with these creative pumpkin carving patterns. Our free patterns, designs, and instructions will turn your plain pumpkin into a memorable Halloween piece of art.


See Reference
Learn more »

Make Your Own Jewelry Box


I love this jewelry box by our beautiful contributor, Amanda of 
Indie Jane. Try this cute jewelry box with lumberjack flannel or soft floral fabric for a different look.


Supplies needed: wooden crate, cork tile, fabric, tape measure, scissors, hot glue gun, cup hooks, T-pins, saw tooth hangers. 


If painting or staining your crate, do this beforehand to allow it time to dry thoroughly. These crates can often be found in antique and thrift stores, but you can also get them in various sizes at craft stores. 


Step 1. Measure out the inside of the crate, and cut the cork to fit inside the bottom.


Step 2. Cut a square of fabric about an inch or so longer than the cork on each side, fold the edges back and secure with hot glue.


Step 3. Place your cork tile into the bottom of the crate. It should fit snugly! You can use a little hot glue on the bottom of your crate if the tile wiggles too much.


Step 4. Screw in a couple of cup hooks on each side. These are best for holding longer necklaces that may not fit inside the crate. 


Step 5. Nail a couple of saw tooth hangers for hanging. (If your crate is on the heavier side, some sturdier hardware may be needed. I've found these work just fine.) Step 6. Hang your crate, then stick T-pins in the cork to hang necklaces, bracelets, rings, etc. This is a functional yet eye-pleasing way to display all your favorite jewelry.


I love this project because it's cute, simple and functional! It's the perfect piece for a bedroom or bathroom. Wherever you get ready each morning. Have fun making something pretty for your space.


See Reference
Learn more »

Woodwork Of The Decade


For the past decade, I’ve randomly stopped by Las Monos Gallery in Andersonville to check out the wonderful and surprising artists shown there. Early this summer I had the opportunity to meet and chat with the gallery’s owner, Michelle Peterson-Albandoz. Michelle salvages discarded wood from construction sites and uses small, component pieces cut with a table saw to create these brilliant patterns and textures. Inspired by the rainforest of Puerto Rico where she spent her childhood, she uses her creative process to confront humankind’s ecological assault, viewing her art as a sort of reversal of discard and waste. Last week she opened her second solo show at LongView Gallery in Washington D.C.


See Reference
Learn more »

Crocheted Coral Reef


Like its real-life counterpart, this coral reef is alive in a way.  Organized by the LA based  non-profit organization, Institute for Figuring, the reef was lovingly constructed by many hands.  According to the Institute for Figuring, the institute is “an organization dedicated to the poetic and aesthetic dimensions of science, mathematics and engineering”, and certainly does this with its Crochet Coral Reef.The public is invited to participate by crocheting different organisms that are added to the larger crochet habitat.  The reef has grown to become one of the largest participatory science and art projects in the world.  It does much more than organize a community to engage with visual art and craft.  It brings attention to the biology of coral reefs, emphasizes their importance, and reminds us of the danger they’re currently in.


Learn more »

Chip Wall Art


Looking for a way to fill that blank wall but don't have permission to paint? All you need is a trip to a major hardware store and an afternoon in front of a good movie to take care of that little dilemma. 


Supplies Needed: 
Large frame with paper insert, a ton of pretty paint chips, double-sided tape squares, and vinyl letters appropriate to the size of your frame or phrase (4" - 6"). I went with a color scheme that involved a variety of tones from some of my favorite colors. It's basically a muted rainbow with plenty of lighter shades to keep things from getting too busy.


1. Experiment with your color layout. 
2. Take a photo of your layout in case your dog runs across it and your colors get all mixed up.


3. Start in the top right corner and attach double-sided tape to each corner of each paint chip. Line the first one up and then use it as your guide to lining up the rest. When you add the second layer overlap the previous row so the names of each color are covered up.
4. Think of a phrase and cut out your vinyl letters to see how you like it. I just used double-sided tape to attach them to my paint chip background because they were see through. Once I was happy with things I framed it. 


Paint chip art is a great option for renters looking to fill a big space without spending a small fortune! It's a fun way to personalize your space.


See Reference
Learn more »

Make Your Vases At Home


Another reason to bring flowers home from the market. This hard and soft elements to create an interesting modern vase. Bring home your favorite blooms and display a grouping of similar vases at your next get together.


You'll Need: A few round, glass jars in varying sizes and widths, a sheet of metal screen as shown above (found at most hardware stores), wire cutters, yarn, scissors, gloves.
Note: Wear gloves to keep your hands safe while working with sheet metal. Not responsible for missing fingers.


Measure the height of each glass and add about 1". Then measure around the circumference of your glass jars and add 2". Cut your metal screen along the straight lines to avoid sharp points (sharp points shown above). Make sure to measure twice and cut once!
Once your metal screen is cut, wrap it around your jar to be sure it's the right size. The ends should overlap about 1".


Choose yarn (or twine) in your favorite color and start at the bottom of the overlap and tie a knot. Wrap your yarn through three times in each little triangle (as shown above). It secures the metal screen to form a vase and adds some color and interest. As you can see, the sharp pointy parts have been cut off the top edge to create a smoother line.


Make three or five for the biggest impact. Spray paint your metal before you tie it together and use coordinating or contrasting yarn for a completely different look.
Ditch the flowers and add tea lights to create interesting votives as the nights grow longer. Any way you customize it, this simple DIY will add a lot of interest to your table scape. Have fun!!! 

Learn more »

Make Your Own Camera Cozy


Today, my pal Kyla Roma is going to share a really fun (and useful!) do-it-yourself camera cozy! Enjoy... One of my favorite things to blog about are every day moments I capture with my husband and friends- but I don't like leaving my cameras rattling loose in my bag, and having a heavy duty camera bag taking over my life is not in my plans! A camera cozy is a quick to make, cute accessory that keeps everything you need close at hand and can swap easily from bag to bag.


Supplies Needed: fabric, pencil, scissors, needle, thread & a sewing machine
1. Choose a fabric for your project. The best type of fabric to choose is something strong and soft, but that won't "shed" and get into your camera. I found a really cute dress at a thrift store that was perfect (because it didn't fit me, and I wasn't going to let someone else snap it up!). If you choose fabric from a vintage or thrift-ed item, cut out the largest section of flat fabric to work from and iron it before you start working. For this dress, I cut out the skirt and made sure I had enough fabric to easily wrap around my camera twice.

2. If you use more than one camera, use the largest one as your guide. Fold the fabric in half, place your camera on top of it (lens facing the fold) and cut around the camera in a semi circle. Make sure you don't cut all the way around- leaving the pieces joined makes sure your cozy is super strong and durable. Make sure to leave extra room on either side of your camera- I cut the fabric into a baguette shape to leave room for extra lenses, but if you cut yours into more of a "V" shape it will work more like a traditional camera case.

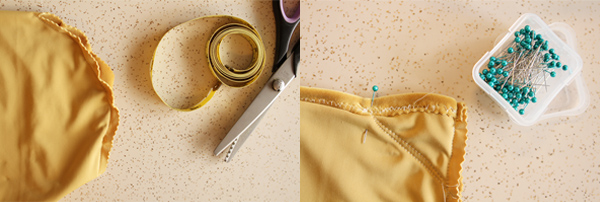
3. Turn your fabric inside out so the "good" sides of the fabric are facing each other. Fold the top edges over and sew a straight edge along it so you have a neat seam. Then sew down along the side of the bag, one at a time (see above, left) joining up the sides of the camera cozy. Once you've sewed these up, you have the basic structure of your bag!
4. If you want to add an extra detail, pin each corner of the bag in two places - one about an inch in from the top corner and one about an inch down from the top corner of the bag. Sew a straight line between these two pins (see above, right) to create a fancier corner.


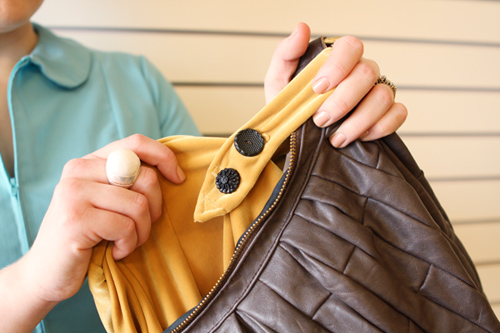
5. Sew on a long, thin piece of fabric as a strap. You can judge the length that's right for you by trying on the bags that you wear the most and seeing where you're comfortable with the cozy hanging in each- make a quick pencil mark at that point and sew across it, or fold the edges inward and sew them into a point. You can add button holes by sewing rectangles and cutting a straight line in the center of them. To line the buttons up to the holes, I placed the strap where I wanted it to line up on the front of the bag, pinned the strap there and sewed my first stitch for each button through the hole to anchor them in the right position. Then you can finish them up normally without worrying.


Slip your camera inside and button the cozy around the strap of your bag to try it out...


Wow!! Its perfectly fit. :)


With your camera cozy in tow you'll be prepared for cute, candid moments whenever they happen. Organizational fashion accessories just make my geeky heart skip a beat.

See Reference
Learn more »